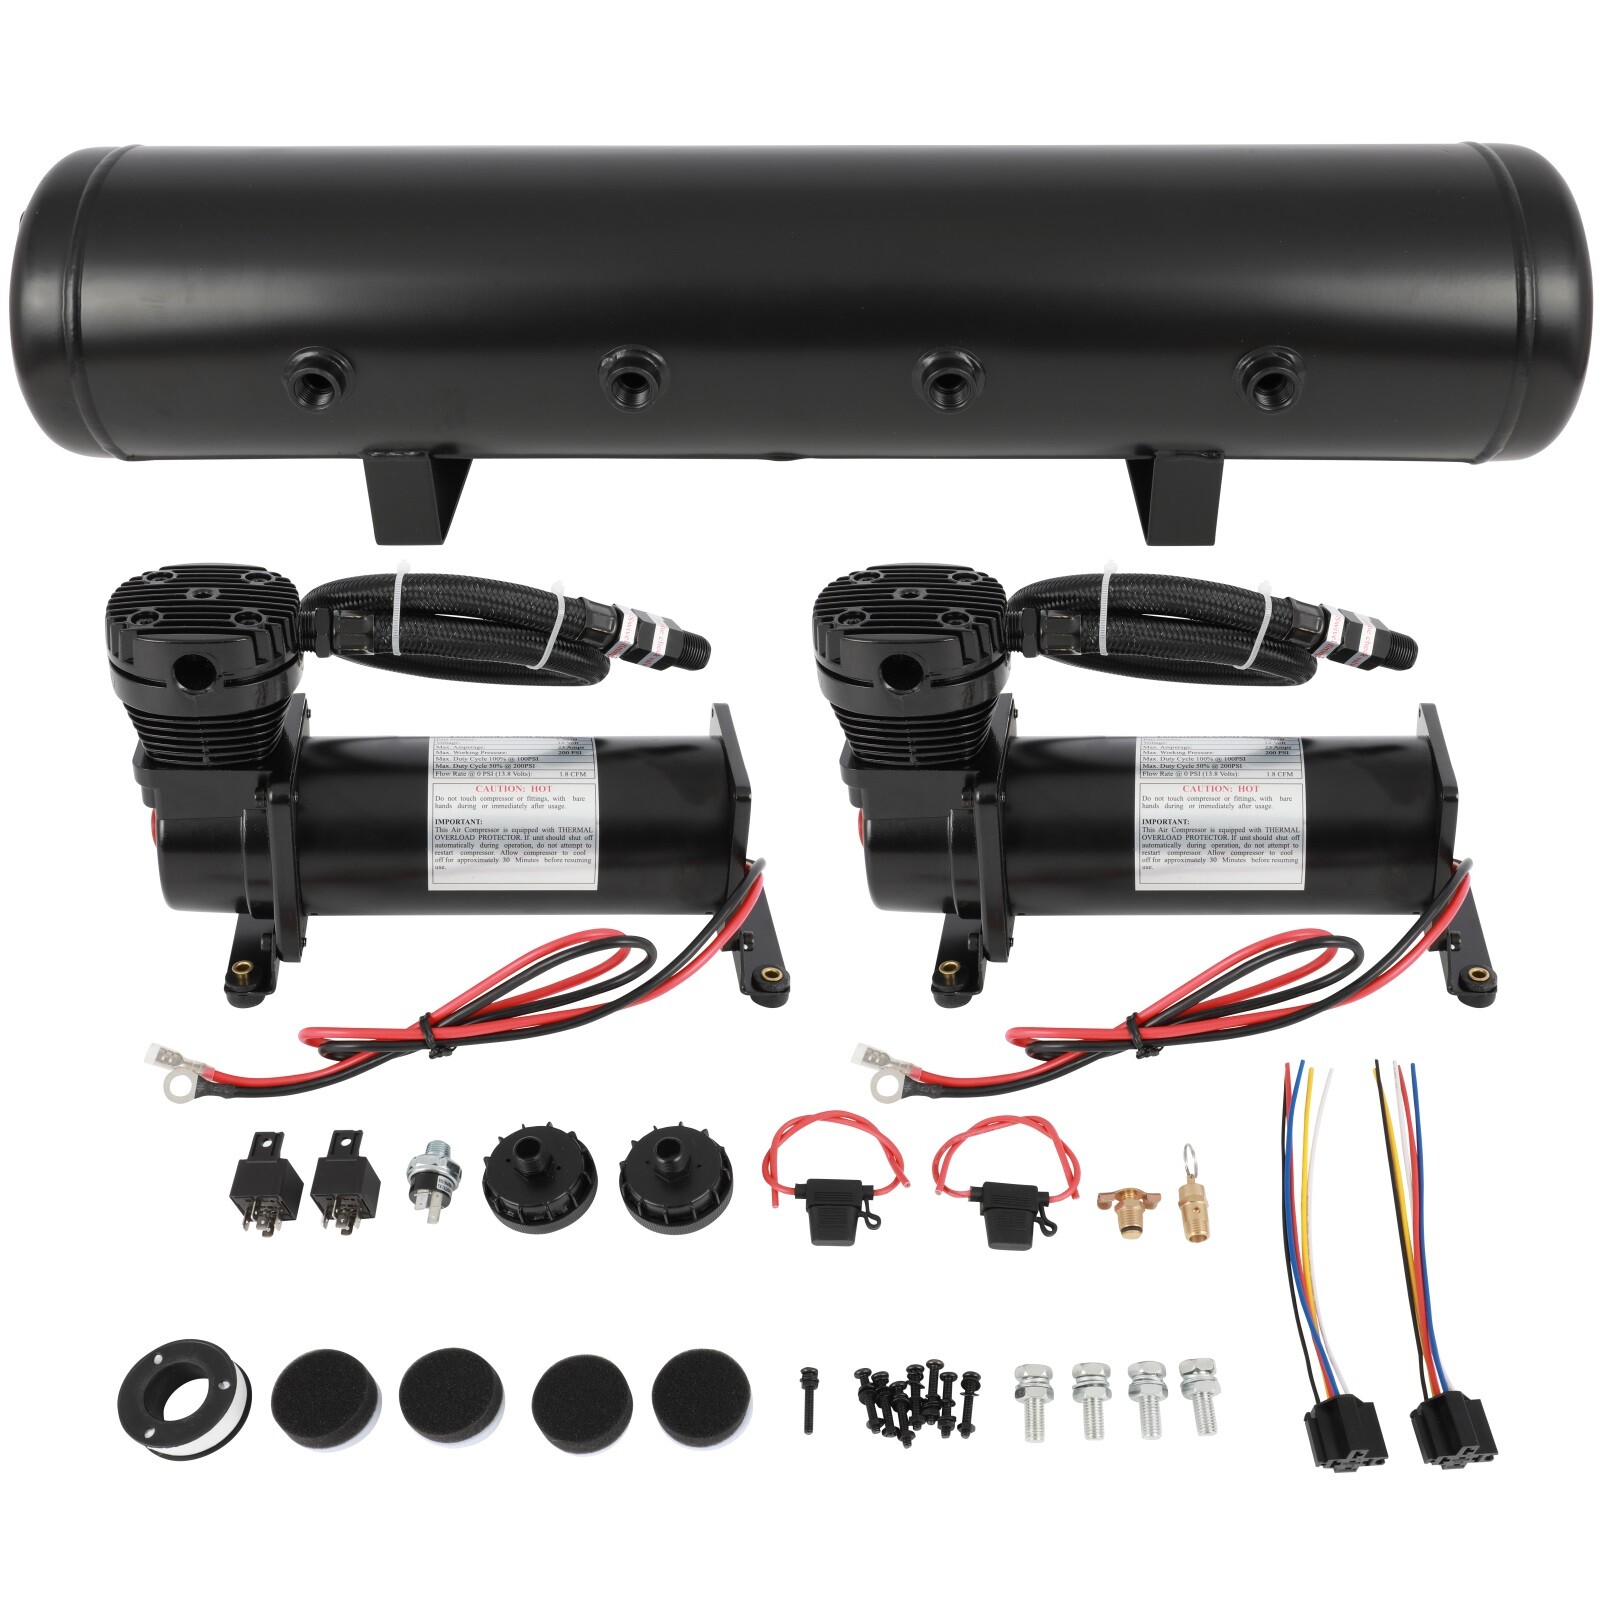
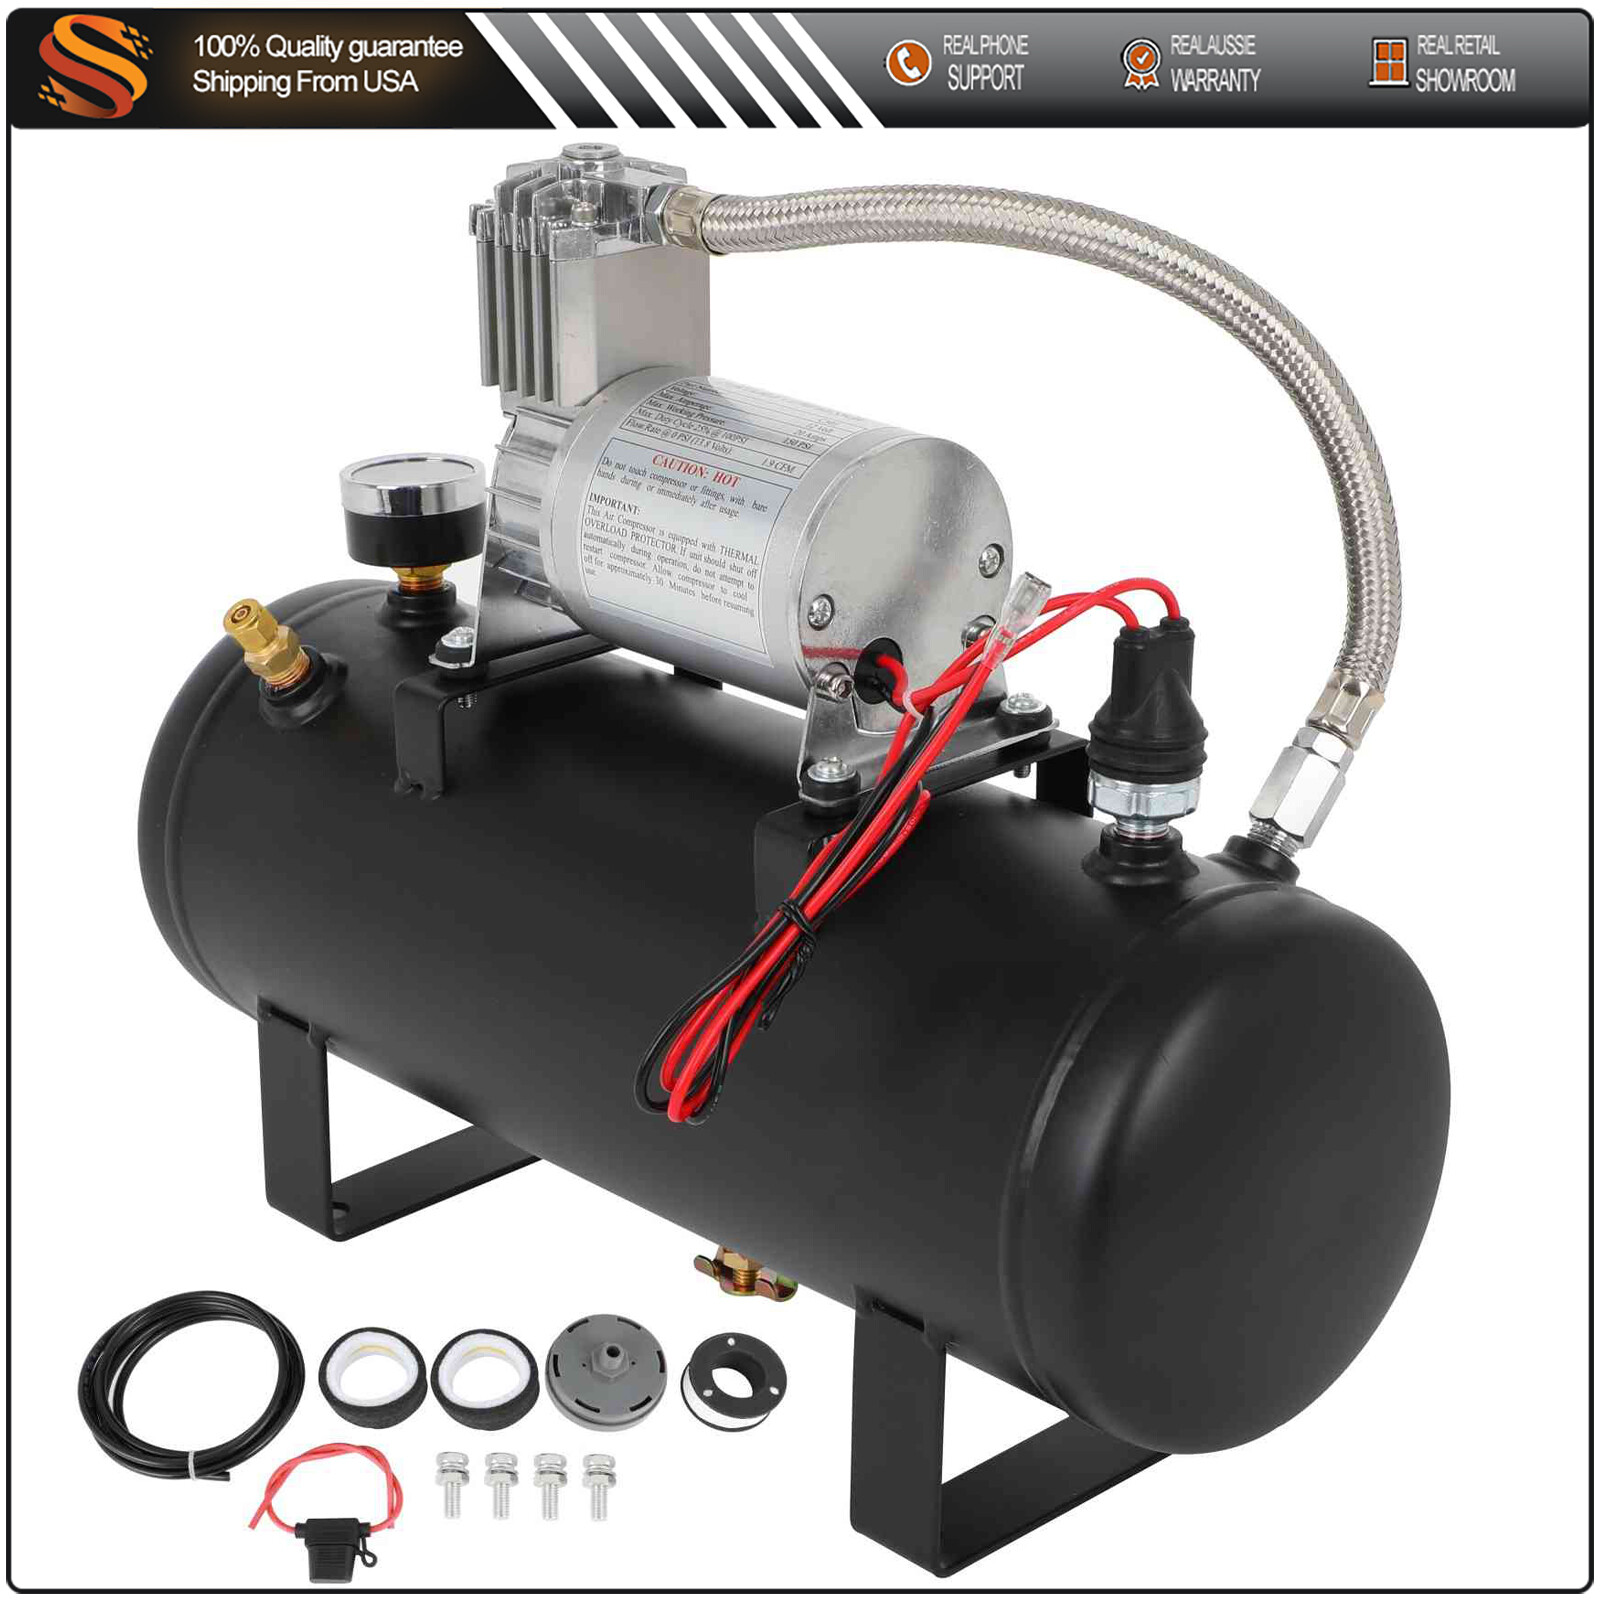
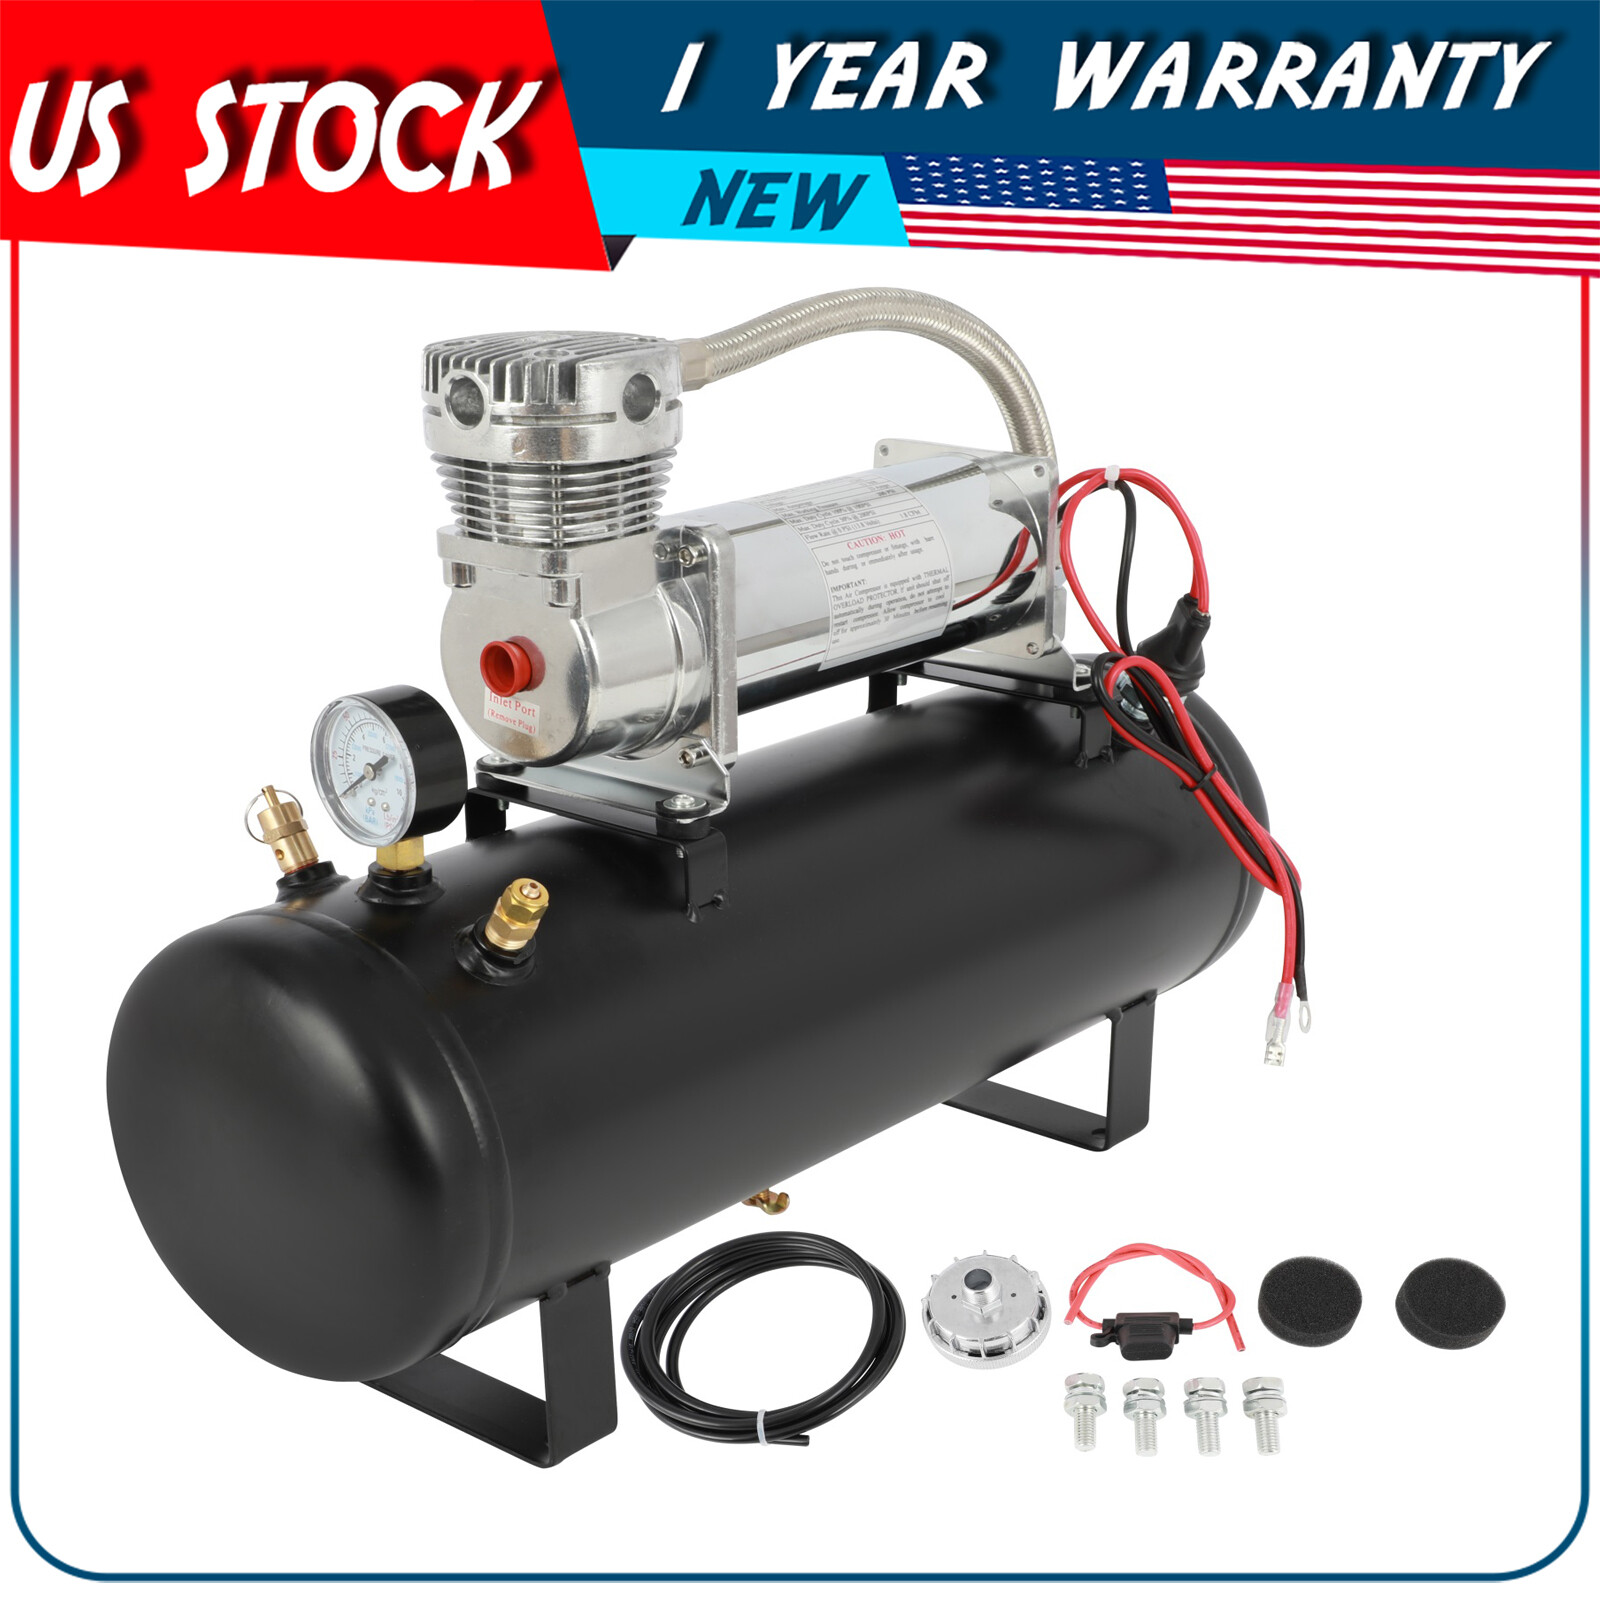
For Train Horns Air Horn Air Suspension Kit Black 12V 200PSI Air Compressor Kit
$ 60.69
Description
Product Information: This black maintenance free heavy duty air compressor rated at 200PSI is designed for use with any high-pressure on-board air system, or other applications that require an air pressure supply. Unit comes with a standard 1/4" NPT stainless steel braided leader hose and mounting hardware. Ideal for all vehicles with a 12V system. Included in this kit: 1 * 200PSI air compressor with 1/4" NPT stainless steel braided leader hose mounting hardware Specification: For Train Horns Air Horn Air Suspension Kit Black 12V 200PSI Air Compressor Kit Product Information: This black maintenance free heavy duty air compressor rated at 200PSI is designed for use with any high-pressure on-board air system, or other applications that require an air pressure supply. Unit comes with a standard 1/4" NPT stainless steel braided leader hose and mounting hardware. Ideal for all vehicles with a 12V system. Included in this kit: 1 * 200PSI air compressor with 1/4" NPT stainless steel braided leader hose mounting hardware Specification: Type: 200PSI black air compressor Thread: 1/4" NPT stainless steel braided leader hose Working Voltage:12 Volt Package Size(inch): 12.2*8.6*6.7 Compressor Size: 9.4"(L)×3.9"(W)×4.4"(H) Max Amp Draw:23 Amps Color:Black Duty Cycle:55%@200 PSI Duty Cycle:100%@100 PSI Material:Metal Max Working Pressure:200 PSI SAFETY INSTRUCTIONS: Do not attempt to disassemble, repair or customize this product. Avoid setting up any parts of this product where there is a risk of falling off or risk of coming in contact with water. Avoid reaching out to touch or pick up any fallen or water submerged parts. Never leave this product unattended during use. Intended for use by adults only. During and immediately after use, avoid touching any part of the compressor with bare hands as it is very hot during such periods. Avoid sounding the air horn when in close range to your ear(s) or the ear(s) of others. Avoid use of product near flames, explosive materials, aerosol products or oxygen devices. Be sure to pump nothing other than atmospheric air. It is important to determine the maximum air pressure for any tool or attachment before using it. Air sprayer or nozzle should always be pointed away from any part of the body. The compressor has Thermal Overload Protection, if this protection activates, cut off the source of power and let the unit cool down for about 30 minutes. This will reset the system and allow you to safely resume use of the air compressor. Make sure your battery ground is detached before you begin. Set the horn up for use only in areas with adequate ventilation. Employ equipment for eye protection during drilling operations. Ensure that your air system has no pressure before you begin. The specific voltage requirement for this horn system is 12 volt DC, therefore installation must be done to a DC power source of 12 volts. Installation Tips: COMPRESSOR MOUNTING: Determine a dry place to mount your compressor. If you have chosen to install in the engine compartment, you should mount it as close to the front as possible to allow for maximum flow of air around compressor and also to avoid heat from the exhaust. IMPORTANT: Never attach the compressor to any plastic or other flexible material. For optimal results, the compressor should be placed as close to the battery as possible. This will reduce the amount of wiring needed. Avoid placing compressor near flammable liquids. If you are planning to move compressor’s air intake to an area other than where the compressor was installed, make sure your placement allows for the airline to be routed from the air inlet of the compressor to the remote inlet air filter Mark the spots for the holes with the mounting base as a guide and then drill. Make sure the compressor is secured. To enhance performance and make sure the battery of your vehicle doesn’t discharge, keep the engine running while the compressor is being used. BRAIDED HOSE INSTALLATION: Connect the stainless steel braided hose of the compressor to the tank’s inlet port. IMPORTANT: The tank’s inlet port must be 1/4" N.P.T. (National Pipe Thread). CHECK VALVE: The check valve is an important part of the air compressor and has only one function: to let air flow from one side to the other, in this case from the compressor to the tank, while blocking air flow in the opposite direction. IMPORTANT: When installing the braided hose do not rotate or remove the inline check valve located at the end of the hose on the side that connects to the air tank. Doing so will damage its seals and will result in damage to your air compressor. REMOTE FILTER: Using a compatible remote air filter installation kit (NOT PROVIED) your compressor’s air intake can be installed in an area other than where the compressor was installed. THERMAL OVERLOAD PROTECTION: The compressor has Thermal Overload Protection, if this protection activates, cut off the source of power and let the unit cool down for about 30 minutes. This will reset the system and allow you to safely resume use of the air compressor. COMPRESSOR ELECTRICAL CONNECTION: The red wire of the compressor should be connected to (+) 12-volt power source. IMPORTANT: To prevent the compressor from over running and possible damage due to an air leak, connect the compressor’s red wire to a power source in the vehicle that only gets power when the vehicle’s ignition is on. Recommended connection points are: windshield wiper motor, blower motor or an accessory terminal on the fuse panel. Make sure to use wire that is as heavy as the wire of the compressor and to use the included fuse for circuit’s protection. Attach the black wire to any of the Pressure Switch’s connections located on the air tank. The remaining Pressure Switch connection should be attached to ground. Secure the end to any metal body or to the negative side of the vehicle’s battery. The ground connection should be rust and paint free. Your compressor is now set for use and will turn on automatically when air pressure in the air tank falls. When air pressure reaches maximum PSI, it will turn off. If the compressor fails to reach the maximum air pressure of the tank, which is the Pressure Switch's cut OFF pressure, check all air connections for leaks. While the compressor is pumping, use soapy water or any bubble solution to perform this check. In case the leak remains after tightening, re-apply thread sealant. MAINTENANCE: Make sure that electrical and fitting connections are regularly inspected, cleaned and tightened when needed. Make sure mounting screws are regularly tightened if needed. Compressor features a washable air filter which should be cleaned using any mild form of liquid soap every two months if it gets dusty. Just remove the front cover of the filter’s housing to reach it. Replacement time frames depend on the operating environment and how often it is used. Clean dirt and dust from heat spreader and motor housing of the compressor. The motor of the air compressor has a maintenance-free lasting lubricant. DO NOT LUBRICATE. SOLUTIONS TO COMMON ISSUES: Issue: Compressor inoperable. Solution 1: Check all switches to make sure they are ON. Solution 2: Check the fuse; if blown, disconnect compressor from power and replace the fuse. Solution 3: Allow compressor to cool off for 30-60 minutes. Solution 4: Check pressure switch, replace if damaged or inoperable. Issue: Excessive moisture in horn or safety valve. Solution 1: Depressurize and drain the tank. Solution 2: Relocate the on-board air system to a drier location. Issue: Continual cutting-off of Thermal overload protection. Solution 1: Relocate the on-board air system to a drier, cooler location. Solution 2: Replace the compressor. Issue: Excessive vibration or noise. Solution 1: Tighten system components. Solution 2: Replace the compressor. Issue: Loss of pressure of tank when compressor is shut off. Solution 1: Tighten drain cock. Solution 2: Examine air and check valves and replace if damaged or leaking. Solution 3: Use soap and water solution on air connections, and tighten connections or repair leaks where needed. S olution 4: Replace safety valve if present in the tank, it may be defective. Issue: Compressor runs continuously and has low air flow. Solution 1: Decrease the frequency of use. Solution 2: Use soap and water solution on air connections, and tighten connections or repair leaks where needed. Solution 3: Clean or replace the air filter element if it is clogged. Solution 4: Replace compressor. Make sure you never attempt to disassemble this horn kit’s electrical components. Never use your bare hands to any part of the compressor immediately after or during use. Avoid operating this product in an area with risk of falling or submergence into a liquid (water). Do not reach out for or touch any component that has fallen or been submerged into water. Make sure you set up in areas with good ventilation. Never sound the air horn anywhere near your ear(s) or that of another person. Make sure your battery ground is detached before getting your installation started. Employ equipment for eye protection during drilling operations. The specific voltage requirement for this horn kit is 12 volt DC, therefore installation must be done to a DC power source of 12 volts. Item Specifics Brand premium_motoring Manufacturer Part Number PR169892E01 Type Horn Part Type Air Compressor Horn Type High Pressure Air Material Metal Fitment Type Direct Replacement Color Black Manufacturer Warranty 1 Year Placement on Vehicle Left Package Size(inch) 12.2*8.6*6.7 Package Weight 9.48LB Voltage 12V Payment We only accept payment through PayPal. You can open a Paypal account at www.paypal.com. Shipping 1. Package handling takes about 2 business days at our warehouse, so please make sure entering correct payment and shipping information before checking out. Once your payment is completed, we are not going to accept any more changes to your order. 2.All domestic orders will be shipped via USPS, UPS or Fedex from our US warehouse and usually arrives to your door in about 2-5 business days. 3.Local pick up is not available. 4.Orders to the rest of world may be shipped out from our warehouse in HongKong. 5.International Buyers C Please Note: a. Import duties, taxes and charges are not included in the item price or shipping charges. These charges are the buyers responsibility. b. Please check with your country customs office to determine what these additional costs will be prior to bidding/buying. Returns 1.All of our brand new items come with a 60-Days money-back guarantee. 2.We define the item as defective only if it doesn't function as described, It is the buyer's responsibility to understand the item description before bidding. 3.We will replace the defective items, provided that they are in stock within the warranty period posted with the listing and the buyer return the original item and pay for the S&H cost for the replacement. 4.We will refund the purchase price if the replacement is not available or buyer prefers a refund and send the original item back at his/her own cost. 5.Shipping& handling cost are not refundable. 6.Man-made damage by abuse or wrong operation is not covered by this warranty. 7.No product liability insurance is assumed. 8.Refunds will be credited within 5 to 7 business days of receiving the return. When we've received and processed the return, we will refund the applicable amount minus any Recovery Fees (See Details Below) for the amount you paid for the item(s), plus any applicable sales tax. Contact Us If you have a question on our items, or have any problem with orders, feel free to contact us please. -Question in confirming if the item fit your vehicle or not? -Question in confusing the specification of this item? -Problem in Biding? -Problem in our service? -Problem in quality of the item? Or any other question / problem, contact us, our customer service team will answer you. DESCRIPTION PAYMENT SHIPPING RETURN POLICY CONTACT US Shop Category Store Home Air Shock Strut Horn Tilt Trim Motor Steering Knuckle Power Brake Booster Shock Strut Strut Mount Cylinder Piston kit Dipstick Ballast Module Bumper Struts & Suspension Kit & Hubs Shock Absorber Assembly Coilovers Brake Caliper Lift Supports Crankcase Vent Valve Removal Tool Metal Heat Shield Sleeve Oil Catch Can Botorcycle Exhaust Pipe Air Dryer Household Air Cooler Shift Knob Lever Head Bushing Air Suspension Valve Solenoid Mud Flaps Protection Shield & Lift Kit Adjustable Rear Control Arm Air Intake Snorkel Brake Drums & Brake Shos Mass Air Flow Sensors Brake Pads & Brake Shoes Airbag Hairspring Coil Spring Hot Item For 2009-2018 Dodge Ram 1500 Chrome Rear Step Bumper w/Dual Exhaust&Sensor Holes USD 186.19 Front Rear Shocks Struts For Nissan Frontier Pickup D21 USD 51.99 For Honda Civic 2006-2011 Front Complete Shocks & Struts with Coil Spring Mount USD 101.64 Dipstick Engine Oil Level For 06-13 Volkswagen Passat Jetta Beetle Golf Rabbit USD 8.99 Power Brake Booster 67-74 For Chevrolet Chevelle A/F/X body Delco Vacuum 11" Dia USD 61.87 New List Item For 02 03 Ford Explorer Mercury Mountaineer Front Rear Struts Stabilizer 8pcs USD 319.99 Rear Complete Struts & Wheel Bearings For ForD EXPEDITION 2007-2013 USD 309.99 Rear Brake Calipers w/ Bracket Pair For 2010 2011 2012 2013 Mazda 3 USD 109.99 Fits 1996-2007 Ford Taurus Front Rear Struts Sway Bar Ball Joints Tie Rod USD 349.99 Fits Ford Taurus Mercury Sable 96-05 Sedan Front Rear Strut Suspension Kit 14pc USD 369.99 Help & Info Payment Policy Shipping Policy Return Policy FAQ About Us For Train Horns Air Horn Air Suspension Kit Black 12V 200PSI Air Compressor Kit Product Information: This black maintenance free heavy duty air compressor rated at 200PSI is designed for use with any high-pressure on-board air system, or other applications that require an air pressure supply. Unit comes with a standard 1/4" NPT stainless steel braided leader hose and mounting hardware. Ideal for all vehicles with a 12V system. Included in this kit: 1 * 200PSI air compressor with 1/4" NPT stainless steel braided leader hose mounting hardware Specification: Type: 200PSI black air compressor Thread: 1/4" NPT stainless steel braided leader hose Working Voltage:12 Volt Package Size(inch): 12.2*8.6*6.7 Compressor Size: 9.4"(L)×3.9"(W)×4.4"(H) Max Amp Draw:23 Amps Color:Black Duty Cycle:55%@200 PSI Duty Cycle:100%@100 PSI Material:Metal Max Working Pressure:200 PSI SAFETY INSTRUCTIONS: Do not attempt to disassemble, repair or customize this product. Avoid setting up any parts of this product where there is a risk of falling off or risk of coming in contact with water. Avoid reaching out to touch or pick up any fallen or water submerged parts. Never leave this product unattended during use. Intended for use by adults only. During and immediately after use, avoid touching any part of the compressor with bare hands as it is very hot during such periods. Avoid sounding the air horn when in close range to your ear(s) or the ear(s) of others. Avoid use of product near flames, explosive materials, aerosol products or oxygen devices. Be sure to pump nothing other than atmospheric air. It is important to determine the maximum air pressure for any tool or attachment before using it. Air sprayer or nozzle should always be pointed away from any part of the body. The compressor has Thermal Overload Protection, if this protection activates, cut off the source of power and let the unit cool down for about 30 minutes. This will reset the system and allow you to safely resume use of the air compressor. Make sure your battery ground is detached before you begin. Set the horn up for use only in areas with adequate ventilation. Employ equipment for eye protection during drilling operations. Ensure that your air system has no pressure before you begin. The specific voltage requirement for this horn system is 12 volt DC, therefore installation must be done to a DC power source of 12 volts. Installation Tips: COMPRESSOR MOUNTING: Determine a dry place to mount your compressor. If you have chosen to install in the engine compartment, you should mount it as close to the front as possible to allow for maximum flow of air around compressor and also to avoid heat from the exhaust. IMPORTANT: Never attach the compressor to any plastic or other flexible material. For optimal results, the compressor should be placed as close to the battery as possible. This will reduce the amount of wiring needed. Avoid placing compressor near flammable liquids. If you are planning to move compressor’s air intake to an area other than where the compressor was installed, make sure your placement allows for the airline to be routed from the air inlet of the compressor to the remote inlet air filter Mark the spots for the holes with the mounting base as a guide and then drill. Make sure the compressor is secured. To enhance performance and make sure the battery of your vehicle doesn’t discharge, keep the engine running while the compressor is being used. BRAIDED HOSE INSTALLATION: Connect the stainless steel braided hose of the compressor to the tank’s inlet port. IMPORTANT: The tank’s inlet port must be 1/4" N.P.T. (National Pipe Thread). CHECK VALVE: The check valve is an important part of the air compressor and has only one function: to let air flow from one side to the other, in this case from the compressor to the tank, while blocking air flow in the opposite direction. IMPORTANT: When installing the braided hose do not rotate or remove the inline check valve located at the end of the hose on the side that connects to the air tank. Doing so will damage its seals and will result in damage to your air compressor. REMOTE FILTER: Using a compatible remote air filter installation kit (NOT PROVIED) your compressor’s air intake can be installed in an area other than where the compressor was installed. THERMAL OVERLOAD PROTECTION: The compressor has Thermal Overload Protection, if this protection activates, cut off the source of power and let the unit cool down for about 30 minutes. This will reset the system and allow you to safely resume use of the air compressor. COMPRESSOR ELECTRICAL CONNECTION: The red wire of the compressor should be connected to (+) 12-volt power source. IMPORTANT: To prevent the compressor from over running and possible damage due to an air leak, connect the compressor’s red wire to a power source in the vehicle that only gets power when the vehicle’s ignition is on. Recommended connection points are: windshield wiper motor, blower motor or an accessory terminal on the fuse panel. Make sure to use wire that is as heavy as the wire of the compressor and to use the included fuse for circuit’s protection. Attach the black wire to any of the Pressure Switch’s connections located on the air tank. The remaining Pressure Switch connection should be attached to ground. Secure the end to any metal body or to the negative side of the vehicle’s battery. The ground connection should be rust and paint free. Your compressor is now set for use and will turn on automatically when air pressure in the air tank falls. When air pressure reaches maximum PSI, it will turn off. If the compressor fails to reach the maximum air pressure of the tank, which is the Pressure Switch's cut OFF pressure, check all air connections for leaks. While the compressor is pumping, use soapy water or any bubble solution to perform this check. In case the leak remains after tightening, re-apply thread sealant. MAINTENANCE: Make sure that electrical and fitting connections are regularly inspected, cleaned and tightened when needed. Make sure mounting screws are regularly tightened if needed. Compressor features a washable air filter which should be cleaned using any mild form of liquid soap every two months if it gets dusty. Just remove the front cover of the filter’s housing to reach it. Replacement time frames depend on the operating environment and how often it is used. Clean dirt and dust from heat spreader and motor housing of the compressor. The motor of the air compressor has a maintenance-free lasting lubricant. DO NOT LUBRICATE. SOLUTIONS TO COMMON ISSUES: Issue: Compressor inoperable. Solution 1: Check all switches to make sure they are ON. Solution 2: Check the fuse; if blown, disconnect compressor from power and replace the fuse. Solution 3: Allow compressor to cool off for 30-60 minutes. Solution 4: Check pressure switch, replace if damaged or inoperable. Issue: Excessive moisture in horn or safety valve. Solution 1: Depressurize and drain the tank. Solution 2: Relocate the on-board air system to a drier location. Issue: Continual cutting-off of Thermal overload protection. Solution 1: Relocate the on-board air system to a drier, cooler location. Solution 2: Replace the compressor. Issue: Excessive vibration or noise. Solution 1: Tighten system components. Solution 2: Replace the compressor. Issue: Loss of pressure of tank when compressor is shut off. Solution 1: Tighten drain cock. Solution 2: Examine air and check valves and replace if damaged or leaking. Solution 3: Use soap and water solution on air connections, and tighten connections or repair leaks where needed. S olution 4: Replace safety valve if present in the tank, it may be defective. Issue: Compressor runs continuously and has low air flow. Solution 1: Decrease the frequency of use. Solution 2: Use soap and water solution on air connections, and tighten connections or repair leaks where needed. Solution 3: Clean or replace the air filter element if it is clogged. Solution 4: Replace compressor. Make sure you never attempt to disassemble this horn kit’s electrical components. Never use your bare hands to any part of the compressor immediately after or during use. Avoid operating this product in an area with risk of falling or submergence into a liquid (water). Do not reach out for or touch any component that has fallen or been submerged into water. Make sure you set up in areas with good ventilation. Never sound the air horn anywhere near your ear(s) or that of another person. Make sure your battery ground is detached before getting your installation started. Employ equipment for eye protection during drilling operations. The specific voltage requirement for this horn kit is 12 volt DC, therefore installation must be done to a DC power source of 12 volts. Item Specifics Brand : premium_motoring Manufacturer Part Number : PR169892E01 Type : Horn Part Type : Air Compressor Horn Type : High Pressure Air Material : Metal Fitment Type : Direct Replacement Color : Black Manufacturer Warranty : 1 Year Placement on Vehicle : Left Package Size(inch) : 12.2*8.6*6.7 Package Weight : 9.48LB Voltage : 12V Payment We only accept payment through PayPal. You can open a Paypal account at www.paypal.com. Shipping 1. Package handling takes about 2 business days at our warehouse, so please make sure entering correct payment and shipping information before checking out. Once your payment is completed, we are not going to accept any more changes to your order. 2.All domestic orders will be shipped via USPS, UPS or Fedex from our US warehouse and usually arrives to your door in about 2-5 business days. 3.Local pick up is not available. 4.Orders to the rest of world may be shipped out from our warehouse in HongKong. 5.International Buyers C Please Note: a. Import duties, taxes and charges are not included in the item price or shipping charges. These charges are the buyers responsibility. b. Please check with your country customs office to determine what these additional costs will be prior to bidding/buying. Returns 1.All of our brand new items come with a 60-Days money-back guarantee. 2.We define the item as defective only if it doesn't function as described, It is the buyer's responsibility to understand the item description before bidding. 3.We will replace the defective items, provided that they are in stock within the warranty period posted with the listing and the buyer return the original item and pay for the S&H cost for the replacement. 4.We will refund the purchase price if the replacement is not available or buyer prefers a refund and send the original item back at his/her own cost. 5.Shipping& handling cost are not refundable. 6.Man-made damage by abuse or wrong operation is not covered by this warranty. 7.No product liability insurance is assumed. 8.Refunds will be credited within 5 to 7 business days of receiving the return. When we've received and processed the return, we will refund the applicable amount minus any Recovery Fees (See Details Below) for the amount you paid for the item(s), plus any applicable sales tax. Contact Us If you have a question on our items, or have any problem with orders, feel free to contact us please. -Question in confirming if the item fit your vehicle or not? -Question in confusing the specification of this item? -Problem in Biding? -Problem in our service? -Problem in quality of the item? Or any other question / problem, contact us, our customer service team will answer you. All rights reserved.